Using an Android tablets for a wireless screen.
The above tablet is a 7” Mid Android 2.2 tablet which has resistive touch. Bottom left it is shown mirroring a Windows 10 desktop on a seven inch screen using TightVNC software.
The 5 inch and 7 inch, although physically different sizes, have the same resolution.
Stylus touch control on the 7” client Mid will back feed and also be shown operating
on the 5” VNC server Screen.
A 5” android phone with a different aspect ratio is also


shown mirroring the Windows 10 desktop using VNC.


Using Plastic
Made from kitchen food chopping boards. Pieces cut to shape then welded
together with a soldering ion. Not the best way to do it. Better to make up wooden
moulds. Melt the plastic in an oven. Ok to do in a shed or in the open. Not so good
done in the kitchen or in other in house rooms.
Building Resistive Touch Screens For Windows 10
I did not want to build 5 inch and 7 inch hand held Windows 10 devices. I just wanted
to go out and buy one. The definition for a handheld computer for me is one where
the device can be held in one hand and cursor movement and text input via an onscreen
keyboard can be entered by the other. There are no serious Windows 10 tablets sold
that can do this for managing what should be expected for typical desktop software.
There are Windows 10 tablets that have capacitive touch. I have one of these with an 8 inch screen but finger touch with or without a bogey on the end will not activate the small software buttons on spread sheet, desk top publisher and graphics programs. To use it for that kind of software the tablet needs an external keyboard and mouse. I used a Bluetooth keyboard and mouse but then to use it I need to set it up on a flat surface i.e. a table some where for it to be used like a laptop. This is still portable but a lot more restrictive than having tablet that can be pulled out out of a jacket pocket and have data entered into it on the go where ever, whether standing up or sitting down.
To have the touch screen device I wanted I would have to make it myself. It would need a HDMI screen 7” or 5” and for it there can be bought resistive touch panels which can activate fine areas of the display with the point of a stylus. The resistive touch panel needs to connect to a controller that joins it to a Windows 10 computer by USB which I have used but touch controllers also have serial connections I haven’t used.

Resistive Touch Panel Controllers For Windows 10
I've used two types and tried a third.
They are not designed to be helpful for building DIY Windows 10 tablets.
First Essentials
The resistive touch panel can bought cheaply on Ebay for money but expensive in time if delivery includes a slow boat from China. Adafruit and the PieHut might be faster but cost more.
MicroChips AR1100 Board
Sold by Adafruit, PieHut and other vendors.
Small footprint
Low Profile Height
Fragile the micro USB and Ziff connectors are only held onto
the board by surface mount soldering. Very easy when building to bend and break off
the usb and zif connectors. The zif connections can be

connector can be substituted by the X Y pin connections on the board. To replace the USB connector would require nimble surface mount soldering.
Bad: The available software to calibrate touch will not work with windows 10. A Windows 7 computer will be needed.
Seven Inch Screen Cases Made Up
Wooden Case
Easier to work with.


PenMount PM6300A-
Has a bigger footprint Board Size: 60 x 26 x 8.4 mm with 2mm pitch pin JST connections. Not good, at least 8.4 mm head room is needed for the AMP connections which means a home built DIY tablet is thicker than need be. Someone with nimble fingers and good soldering skills might be able to de solder the AMP connections.
The availability of HDMI 7” screens.
Question! When did people start building motor cars instead of horseless carriages? It was probably when they forgot about horses and started designing wheeled vehicles they could put mechanical motors on.
For amateur Windows 10 tablet builders they are stuck using screens designed for fitting onto panels in buildings or for vehicles not for putting in flat pack cases to make portable Windows OS tablets. Whatever the endeavours of DIY tablet builders, at the moment, with the available current components it is going to be a bulky object compared to Android and Apple tablets.

The HDMI 7” screens above are typical of those found on Ebay. Most come with capacitive touch panels attached which need to be striped off and replaced with resistive touch panels for Windows 10 programs.
Others come with 4 wire touch panel installed with embedded Wave Share controllers designed with touch configured for the Raspberry PI. The embedded controller can be bypassed and the four wire flat flex cable can be attached to the AR1100 Board’s zif connector but for some reason, maybe a faulty panel it would not work for me. It was replaced with a third party resistive panel which did work.
Caution needed for HDMI screens with touch panels built in ready calibrated and configured for the Raspberry PI. The X and Y calibration might not be the same for Windows PC.


The Adafruit Backpack Screens
I bought an Adafruit’s five inch Backpack screen. Out the box it was setup for mouse mode. This worked OK for the Raspberry PI and for a Windows 10 Stick PC. In mouse mode there was no long press feature for right click which really is needed for desk top usage. Switching to digitizer mode proved disastrous. Cursor movement up and down the screen worked as should but across the screen movements left sent the cursor right and right movements sent the cursor left. Worse Adafruit’s AR1100’s configuration software wouldn’t work with Windows 10 so I couldn’t just put it back to mouse mode. Had I known then the AR1100’s software needs to work with Windows 7 I might have recovered the controller’s working function instead I pulled it apart and tried to to juggle the the touch panel’s X and Y around until the soldering iron burnt out the tracking.
Adafruits Backpaker HDMI screen is an example for a way DIY tablet builders would like hardware development to go.
With the built in AR1100 chip it is a compact as a two board sandwich with with panel.
If issues with calibration AR1100 for the PI being different for windows might create a problem. Ideally the HDMI screen and touch controller make a separate unit and the option for swapping it’s use for Windows 10 and the Raspberry PI computers whenever might be inhibited in digitizer mode.
Using Microchips free standing board once calibrated with a Win 7 computer for digitizer mode will work well for Windows 10 Stick PCs and other portable Windows computers. Swapping over to a Raspberry PI hasn’t been tried yet
Computers Used
There are not any DIY kits for building computer tablets. For an amateur it means scratch building with components intended for installing screens in houses or commercial buildings, or in vehicles. These do not make comfortable flat thin tablets.
There is a way to use existing Android tablets with a wireless VNC connection. I have had this working but reliability was questionable in headless mode. Another problem a resistive touch panel would have to overlay the custom built tablet which, will already have a capacitive touch panel built in.
There is one Android OS tablet Flysight HD 900 that has a HDMI input. It is the only one I’ve found . It has a 9” screen a bit too large for me. A seven or eight inch screen would be more comfortable for when adding a resistive stylus touch panel to it.
Whatever the approach an amateur takes to DIY build a stylus operated tablet, component manufacturers and suppliers are not focused to adding custom parts to their stock or sales lists for it. This is probably because they can’t see in the market the need some computer users have for a Windows tablet where it would useful to add data on the go into desk top software. That software being the same they are expected to use in the work place or on a home based stationary computers.
Instead component manufacturers and suppliers seem to believe capacitive finger touch is the best thing ever. With the market that has a lucrative demand for Android and Apple tablets which have software built for capacitive touch, commercially there is not much reason to change. Unfortunately for the serious need to enter data into workman type software such as word processors, desk top publishers, and graphics manipulation programs finger touch is not really fit for purpose on small portable screens.
Microsoft handheld computing has quiet a long history starting off with PDAs without embedded phones, then making PDAs with embedded phones. I still use Windows Mobile 6 and 6.5 devices today for a mobile phone. Also as I can use a stylus on it’s small 2¾" resistive touch screen to use Word and Spread Sheet applications along with my own custom built programs. The data I can move to a Windows computer with Active Sync or Windows Mobile Device Centre transfers applications. Unfortunately other Windows Mobile 6.5 software the device has for Internet Browsing and Email client will no longer work as they did with the latest Internet and WEB services.
After WM 6.5 Microsoft appears to self destructed it’s mobile device market. No more
pretence for it’s PDA origins. The practical stylus touch for Office type software
gone. Instead they tried to play catch up with Apple and Androids mobile phones with
finger touch. They ended up marketing a Windows 10 mobile phone which appeared as
bad copy of existing Android and iPhones that no one wanted or needed.
If Microsoft
maintained a stylus touch and upgraded it’s office software with the embedded mobile
phone included it might have maintained a small viable corner of the market for those
who needed it for serious data input. In the big cooperate World the sales focus
is probably for the large market and big bucks not for not a small profit from a
niche market. For a home builder Raspberry PI Zero and Beagleboard might be a modern
day way to substitute for a Windows Mobile PDA.
Resistive Touch Screen Woes
Hardware I’ve constructed.


Adafruit STEMMA Cable -
JST Japan Solderless Terminal

Good: Penmount calibration software will work with the Windows 10 OS.
Task Scheduler
VNC Mirroring a screen and/or going Headless with portable Windows 10 PCs
A VNC connection between two computers usually means each device having to show the desktop on its own screen. Without the host computer having a screen there is no display the VNC software can mirror reliably on the client.
Removing an HDMI screen from a PC stick computer while booted up will remove the graphics card controller from being loaded in and being accessible for setting screen resolutions from the client computer.
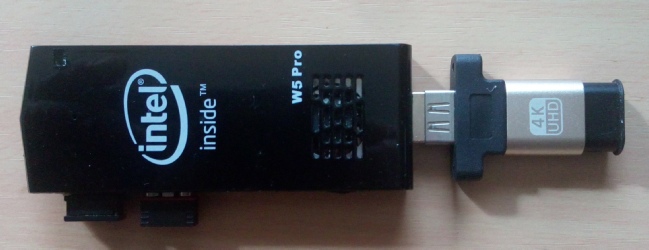
The above picture shows the hardware needed for a PC stick computer to work in a
headless mode to display it’s screen on the VNC client. Top a stick computer, attached
to it via HDMI gender changer a HDMI to VGA adapter. Some of the VGA sockets have
resisters pinned into them. This creates a fake virtual VGA monitor for PC stick
computer. See the link below.
Simple Display Emulator with an HDMI-
Centre a small portable router with a power pack attached. This creates a specialised WIFI hotspot specifically for a localized VNC network. The VNC network uses the stick PC’s built in WIFI and needs to be set at startup. The USB WiFI dongle creates a second WIFI access for normal personnel web use.
Using a 5” Android Phone as VNC viewer to be used as the monitor for the stick PC is a bit pointless as the Android Phone has capacitive Touch. Finger touch will not accurately activate the small menu buttons on Windows desk top software.

HDMI to VGA Adapter With Resisters added to Fake a virtual VGA creen
A Cheap Router to create own
wifi network
Other HDMI headless adapters that work.
Improvised wireless display sending made from HDMI to VGA or HDMI to DVI adapters are not good options. When displaying by VNC software the Intel HD graphics adapter uses a some kind of virtual display setting which doesn't alloy custom resolution settings.
ON EBAY listed as 1920x1080 4K Display Emulator Fake Locking Headless VGA Virtual
HDMI-
.jpg)
Making the Stick PC headless and displaying it’s screen wirelessly on another computer with VNC is not straight forward. Before the VNC server will run and broadcast a display it will need to boot into windows 10 operating system before the VNC server will become active. Until that happens the Window’s boot up procedures will be hidden. Any windows boot up features that can run at boot up requiring user mouse or key board will need to be disabled.
: A Windows 10 PC Stick with a fake HDMI television dongle attached.
:A power pack for the PC stick.
:A portable router with its own battery power supply. OR! Android phone configured as a HotSpot.
:Need two WiFi adapters first to hold and maintain a VNC connection with the router. The second for user personal browsing of the Internet.
: Need a VNC server software installed on the PC Stick with a fake HDMI television dongle.
: Need a fixed known IP address on the headless Windows 10 PC stick for other VNC viewer devices to connect to.
Link Fixed IP Using Windows 10 Settings
Link Fixed IP Using Windows Control Panel
https://www.thewindowsclub.com/set-
Qres Software
Windows 10 Boot up essential preparation.
: Need to establish boot up into windows operating system so to connect to Tight VNC server first without interruptions requiring user input. The Windows Windows boot up process will not be visible on the device being used for a VNC wireless screen. Boot up automatic repair and drive checking needs to be disabled.
: A bat file set to run at startup with command line to connect the WiFi adapter to the portable router used to keep the VNC wire connection.
A command line to initally set a small screen resolution to fit the smallest screen device the user could use.
https://www.itechtics.com/change-
https://winaero.com/change-
Qres
https://www.softpedia.com/dyn-
https://www.softpedia.com/get/Multimedia/Video/Other-
xcopy \\domain.com\scripts\qres.exe c:\users\default
cd c:\Users\DefaultQRes.exe /x:800 /y:600
How to disable automatic repair at Windows 10 boot
https://winaero.com/how-
:Need to automatically boot into Windows 10 with Administrative privileges.
: A Windows 10 PC Stick with a fake HDMI television dongle attached.
:A power pack for the PC stick.
:A portable router with its own battery power supply
:Need two WiFi adapters first to hold and maintain a VNC connection with the router.The second so user can have personal browsing of the internet.
: Need VNC server software installed on the PC Stick with a fake HDMI television dongle.
: Need a fixed ip address on the headless Windows 10 PC stick for other VNC viewer devices to connect to.
Windows 10 Boot up essential preparation.
: Need to establish boot up into windows operating system so to connect to Tight VNC server first without interruption by a requirement for user input which will not be visual. Windows boot up automatic repair and drive checking needs to be disabled.
: A bat file set to run at startup with command line to connect the WiFi adapter to the portable router used to keep the VNC wire connection.
A bat file to stop windows updates requesting user input before VNC is run after bootup
A command line and software to initally set a small screen resolution to fit the smallest screen device the user could use. (QRes)
https://www.softpedia.com/get/Multimedia/Video/Other-
xcopy \\domain.com\scripts\qres.exe c:\users\default
cd c:\Users\DefaultQRes.exe /x:800 /y:600
How to disable automatic repair at Windows 10 boot
https://winaero.com/how-
Navighation
Page 1 Current Development Intoduction
Hard Ware
Using A Stylus
old Development
Page
Building
New Page
Building Resistive Touch Screens
Navighation
Page 1 Current Development Intoduction
Hard Ware
Using A Stylus
old Development
Page
Building
New Page
Building Resistive Touch Screens
Creating a Stylus Touch Screen
Going
Headless Whith VNC